Atlantis access to Chainguard using OIDC in Kubernetes
What's the problem
When managing Chainguard through Terraform, specifically via Atlantis, you need to authenticate to Chainguard.
Traditionally this is done by adding environment variables to the Atlantis pod. Doing it this way means you've got to now manually manage secrets. We all know that if a secret is manually managed it's not getting rotated for fear of breaking something random that's using that secret that should not have been
Solution
Chainguard allows you to assume identities via OIDC. If you're familiar with Google Cloud, this is "Workload Identity Federation"
Some steps cant be automated
Because we need to write terraform to allow atlantis to then run terraform against chainguard, we run in to a chicken-and- egg issue. How can we apply the Terraform to allow access to Chainguard from Atlantis if we need atlantis to apply the terraform.
For that reason, this entire page details the manual steps you need to run.
Prerequisites
In order to follow along, you should have:
- Kubernetes cluster with a public JWKS endpoint.
- As a solution to get around this, you can also upload the JWKS. This is explained later
- Chainguard Organisation
Install required tooling
In order to configure the below, you will need the below installed and set up.
For installing Terraform/OpenTofu I suggest using tfswitch ⧉
Config
The below section guides you through creating the config files and the commands to run to apply them.
provider.tf
Create a file called provider.tf. In that file put:
# provider.tf
terraform {
  required_providers {
    chainguard = {
      source  = "chainguard-dev/chainguard"
      version = "0.2.11"
    }
  }
}

provider "chainguard" {}
main.tf
First you will need to get your clusters issuer URL.
Run the below depending on your cluster, and keep it to hand. We need this URL later
Next we will be creating the binding between a Kubernetes service account and Chainguard.
The steps you follow depend on if your cluster has a public issuer URL, or a private URL.
How do I know if the endpoint is public
The below sections depend on if your cluster's OIDC issuer URL is public.
Most clusters have a public OIDC issuer URL. An exmaple is an EKS cluster. Note the field called OpenID Connect provider URL
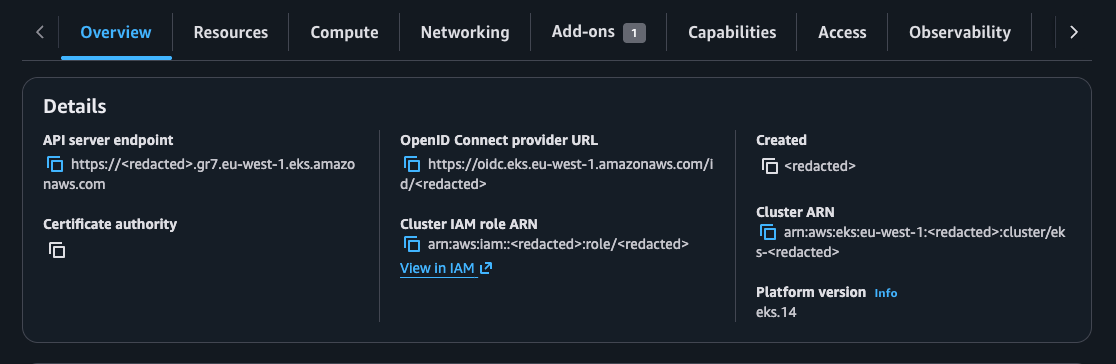
This endpoint exposes the clusters OIDC Keys, as well as the identity it uses to sign these tokens.
An example of a token minted by Kubernetes is below. Pay attention to the line iss. This is the endpoint we need to check.
{
  "aud": [
    "<redacted>"
  ],
  "exp": 1781100596,
  "iat": 1781096996,
  "iss": "https://kubernetes.breadnet.co.uk",
  "jti": "<redacted>",
  "kubernetes.io": {
    "namespace": "atlantis",
    "node": {
      "name": "rg-utils-1",
      "uid": "820c658a-e8a1-46dc-8df1-768db2d9f247"
    },
    "pod": {
      "name": "atlantis-68c7589f9d-mnts7",
      "uid": "92017bbb-5f9a-4006-8cf4-8fc4009d4d7f"
    },
    "serviceaccount": {
      "name": "atlantis",
      "uid": "2d411b87-498b-48c6-a66f-04aa169d97bf"
    }
  },
  "nbf": 1781096996,
  "sub": "system:serviceaccount:atlantis:atlantis"
}
We should be able to curl this and get back a response.
We should then be able to see something like
{
  "issuer": "https://kubernetes.breadnet.co.uk",
  "jwks_uri": "https://kubernetes.breadnet.co.uk/.well-known/jwks.json",
  "response_types_supported": [
    "id_token"
  ],
  "subject_types_supported": [
    "public"
  ],
  "id_token_signing_alg_values_supported": [
    "RS256"
  ]
}
If this works, it means your endpoint is public, and you can follow Public Issuer. If it's failed, follow Private issuer
Create a file called main.tf. In that file put:
You will need to change the issuer value to reflect that of your cluster
data "chainguard_group" "root" {
  name = "breadnet.co.uk" # CHANGE ME!
}

resource "chainguard_identity" "atlantis" {
  parent_id   = data.chainguard_group.root.id
  name        = "atlantis"
  description = "Atlantis on utils cluster"

  claim_match {
    issuer          = "https://kubernetes.breadnet.co.uk" # CHANGE ME!
    # subject pattern explained: This is the namespace and service account of the pod you intentd to connect to Chainguard.
    #                  system:serviceaccount:<namespace>:<service account>
    # So in this case we're connecting the `atlantis` service account in the `atlantis` namespace
    subject_pattern = "system:serviceaccount:atlantis:atlantis"
    audience        = "issuer.enforce.dev"
  }
}

data "chainguard_role" "registry_editor" {
  name   = "registry.editor" # Can put what ever you want here.
  parent = "/"
}

resource "chainguard_rolebinding" "binding" {
  identity = chainguard_identity.atlantis.id
  group    = data.chainguard_group.root.id
  role     = data.chainguard_role.registry_editor.items[0].id
}

output "atlantis_chainguard_identity" {
  value = chainguard_identity.atlantis.id
}
Get the keys from your cluster, and save them to a file called keys.json
What if the keys expire?
Cloud providers sometimes rotate the keys, so you will need to re-run the above command and then re-apply the terraform if this happens
Create a file called main.tf. In that file put:
You will need to change the issuer value to reflect that of your cluster.
data "chainguard_group" "root" {
  name = "breadnet.co.uk" # CHANGE ME!
}

resource "chainguard_identity" "atlantis" {
  parent_id   = data.chainguard_group.root.id
  name        = "atlantis"
  description = "Atlantis on utils cluster"

  claim_match {
    issuer          = "https://kubernetes.breadnet.co.uk" # CHANGE ME!
    # subject pattern explained: This is the namespace and service account of the pod you intentd to connect to Chainguard.
    # So in this case we're connecting the `atlantis` service account in the `atlantis` namespace
    #                 "system:serviceaccount:<  ns  >:<  sa  >"
    subject_pattern = "system:serviceaccount:atlantis:atlantis"
    audience        = "issuer.enforce.dev"
  }
  static {
    issuer_keys = file("keys.json")
  }
}

data "chainguard_role" "registry_editor" {
  name   = "registry.editor" # Can put what ever you want here.
  parent = "/"
}

resource "chainguard_rolebinding" "binding" {
  identity = chainguard_identity.atlantis.id
  group    = data.chainguard_group.root.id
  role     = data.chainguard_role.registry_editor.items[0].id
}

output "atlantis_chainguard_identity" {
  value = chainguard_identity.atlantis.id
}
backend.tf
You should store your terraform state in a remote backend.
Setting up a backend is out of scope for this document.
Please refer to
- Terraform: Backend block configuration overview ⧉
- OpenTfu: Backend Configuration ⧉
Login to Chainguard, and terraform apply
Elevated permissions needed
In order to run the below commands, you need elevated permissions in Chainguard.
I have not tested the exact permissions neeed, but I found owner works.
When running the above terraform, we have to run this locally and not from Atlantis.
To log in to Chainguard, run
This will take you through the login process and store credentials locally on your computer.
Next we can apply the terraform.
It will ask if you want to confirm, type yes.
Validate resources are created
In theory, all resources were created. Verify this in the UI by going to Settings > Assumed Identities ⧉
You should see your identity present.
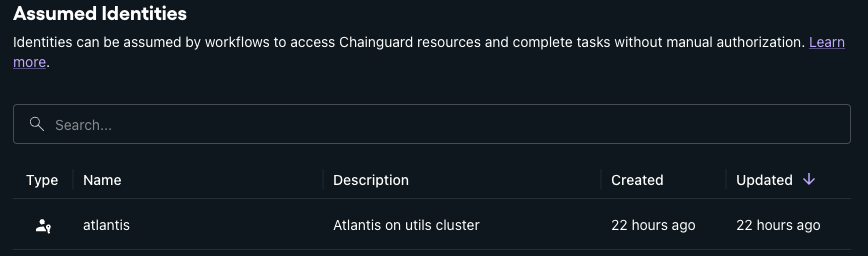
Click on your identity, and make a note of the ID, as we need this later. Make note of it!
Atlantis config
Atlantis can be deployed by hand cranking the YAML, or using the Atlantis Helm Chart ⧉
Below shows an example of a barebones Atlantis deployment, with the changes you need to make.
apiVersion: apps/v1
kind: Deployment
metadata:
  name: atlantis
  namespace: atlantis
  labels:
    app.kubernetes.io/name: atlantis
  annotations:
    reloader.stakater.com/auto: "true"
spec:
  replicas: 1
  selector:
    matchLabels:
      app.kubernetes.io/name: atlantis
  template:
    metadata:
      labels:
        app.kubernetes.io/name: atlantis
    spec:
      securityContext:
        fsGroup: 1000
      serviceAccountName: atlantis
      containers:
        - name: atlantis
          securityContext:
            allowPrivilegeEscalation: false
          image: ghcr.io/runatlantis/atlantis:v0.43.0
+         volumeMounts:
+           - name: oidc-token
+             mountPath: /var/run/chainguard/oidc
+             readOnly: true
  ports:
      - name: atlantis
        containerPort: 4141
+     volumes:
+       - name: oidc-token
+         projected:
+           sources:
+             - serviceAccountToken:
+                 path: oidc-token
+                 expirationSeconds: 600
+                 audience: issuer.enforce.dev
Deploy the changes to your Cluster via whatever means you use. Be that kubectl, flux or argo
How to use Terraform with the OIDC token
Once all the configuration is done, the below shows how to use the Chainguard provider, with the OIDC token.
You will need to replace identity_id with the ID value from the Chainguard UI.
terraform {
  required_providers {
    chainguard = {
      source  = "chainguard-dev/chainguard"
      version = "0.2.11"
    }
  }
}

provider "chainguard" {
  login_options {
    identity_token = "/var/run/chainguard/oidc/oidc-token"
    identity_id    = "<identity ID from UI>"
  }
}
What does identity_token = "/var/run/chainguard/oidc/oidc-token" do?
From the docs for Chainguard terraform provider ⧉
identity_token(String, Sensitive) A path to an OIDC identity token, or explicit identity token.
This is the JWT token that the provider then exchanges with Chainguard's STS server to get a Chainguard token, which it then
makes requests. The actual file /var/run/chainguard/oidc/oidc-token is populated by Kubernetes using the service account the pod uses.
You can read more about this at serviceAccountToken projected volumes ⧉
Because Atlantis is in Kubernetes, it can access the /var/run/chainguard/oidc/oidc-token file, and uses this to authenticate.
Security Considerations
By using a pod-wide token in Atlantis, it means that any project on that Atlantis instance can then also access Chainguard
with whatever permissions you've given the Assumed Identity.
Further reading
- Chainguard Overview of Assumable Identities ⧉
- Chainguard Documentation on Assumed Identities for Kubernetes ⧉