Airflow basics
This page was set to be reviewed before 2022-01-01 by the page owner.
Contact the page Owner (opens default mail client) if you require this page to be updatedOutdated pages are managed through the outdated page site
Airflow exists for the sole purpose of removing the need to write a bash or python script, set up a server with a cron job and then run your ETL pipeline. With Airflow, we're doing all this under one roof with monitoring and visualization built in.
Airflow uses something called a DAG (Directed acyclic graph)
Airflow is primarily written with Python scrips that compose of the below imports
from airflow import DAG
                                                                                                                                             from datetime import datetime
We need to use datetime as airflow runs certain operations on a time schedule, an example is below
with DAG("my_dag", start_date=datetime(2022, 1, 1), schedule_interval="@daily") as dag:
What happens here is we:
- Define the dag with a name
my_dag- Set a start time that the Dag is effective from
- 2022, january the first
- Set a schuedle time
- Daily at midnight (see below table)
- Can also be a cron job
We have a set few options of built-in timings we can use, or a cron job.
Presets
Preset
Meaning
Cron
None
Don’t schedule, use for exclusively “externally triggered” DAGs
N/a
@once
Schedule once and only once
N/a
@hourly
Run once an hour at the beginning of the hour
0 * * * *
@daily
Run once a day at midnight
0 0 * * *
@weekly
Run once a week at midnight on Sunday morning
0 0 * * 0
@monthly
Run once a month at midnight of the first day of the month
0 0 1 * *
@yearly
Run once a year at midnight of January 1
0 0 1 1 *
Note: use schedule_interval=None opposed to directly quoting with "none"
Another way to set out the config is like below:
default_args = {
    'owner': 'airflow',
    'depends_on_past': False,
    'start_date': datetime(2015, 12, 1),
    'email': ['airflow@example.com'],
    'email_on_failure': False,
    'email_on_retry': False,
    'retries': 1,
    'retry_delay': timedelta(minutes=5),
    'schedule_interval': '@hourly',
}

dag = DAG('tutorial', catchup=False, default_args=default_args)
Each section is self-explanatory (provided you can understand the general key value pari's name) Some are not, I will explain below
- depends_on_past
depends_on_past(boolean) when set to True, keeps a task from getting triggered if the previous schedule for the task hasn’t succeeded.- retry_delay
- The delay after a failure before it should try the DAG again
- owner
- Who owns the file permissions and who the program runs under
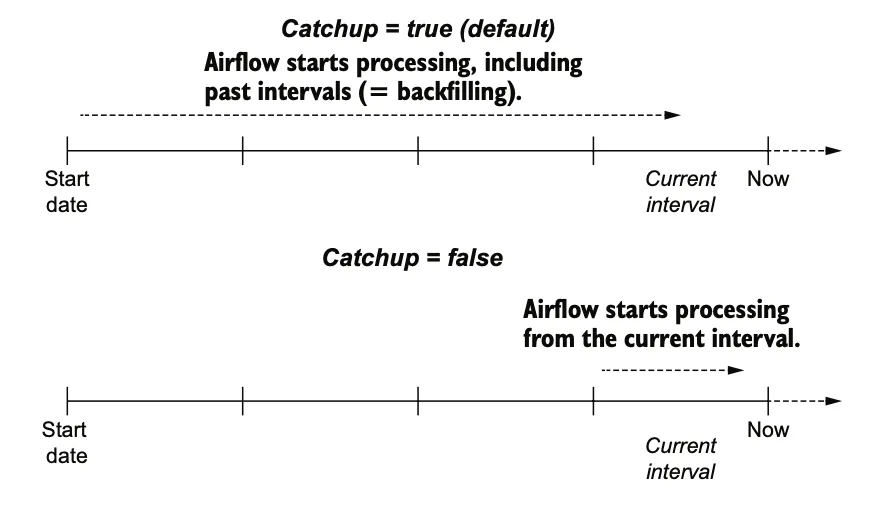
The catchup is quite advanced, so we will deep dive it below
Catchup
We need to make some assumptions here
- Assume
- Start date of 2020-1-1
- Start time of 6am
- Schedule interval of hourly
The action will happen at 2020-1-1 7am
Use the equation below
Trigger Point → start_date + { schedule_interval } → till the end.
In simple terms
If you set the creation date a year ago, and upload it will create many dag instances, to prevent this we set catchup=False
The below explains this in way too much detail, but it's good to have
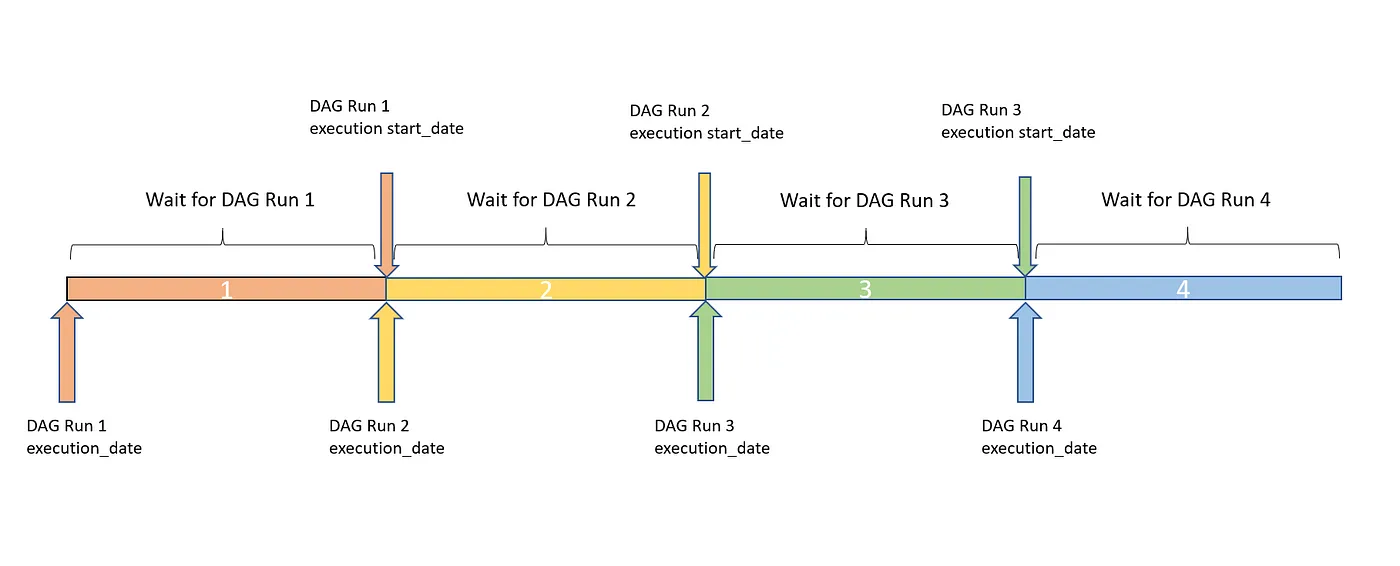
In the above image we are initial config where everything is fine and our DAG Run happened at 6. Then we paused the DAG.
Here we see that since at the next schedule DAG run was paused hence start_date for the schedule is not available.
At the next schedule the same happened (DAG run was not triggered). Now we enable or schedule the DAG run from console
In the above diagram we see at the next schedule previously missed DAG Runs were triggered. Notice start_date is the next schedule (9). While the Execution dates are the actual ones, if you notice, start_date are same for the last three DAG runs. This denotes backfill. So first DAG run for execution date of 6 happened then for 7 and then for 8.