Configuring Talos for OIDC Authentication via Pocket-ID
What this document aims to provide
This document aims to assit a Kubernetes administrator setting up Talos and Pocket-id, so that Kubernetes can authenticate users by a pass key.
Configure Pocket-id
Create application
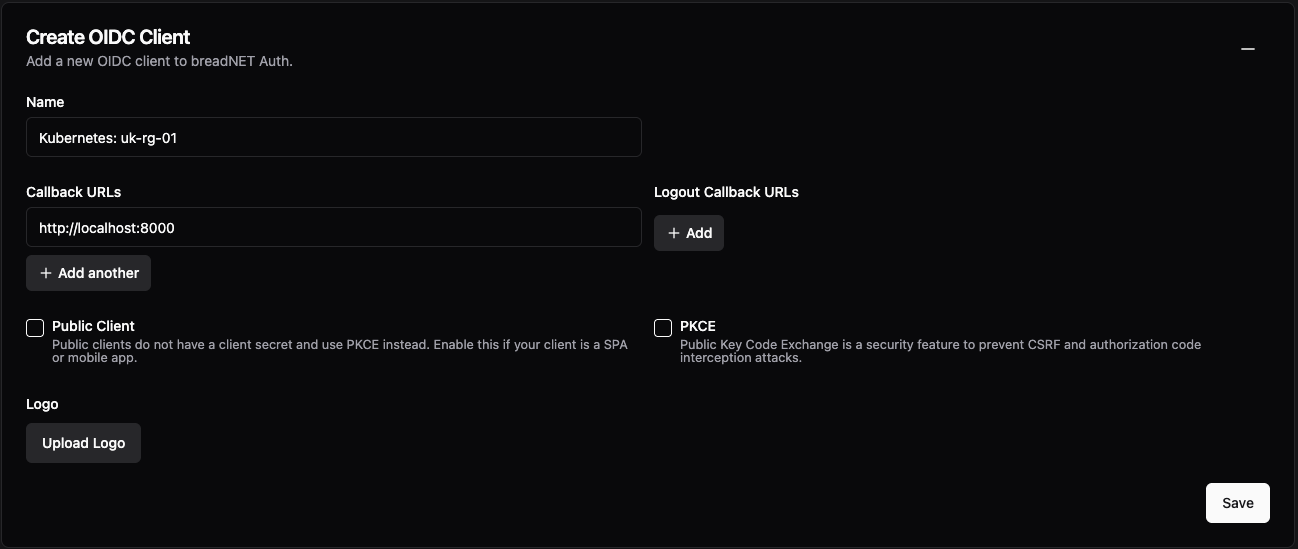
In your Pocket-id instance, navigate to OIDC Clients
Click Add OIDC Client at the top right
Name the client, I am naming mine the cluster name, which will be Kubernetes: uk-rg-01
Set the Callback URLs to http://localhost:8000
Click Save
You should now have a page that looks like the below
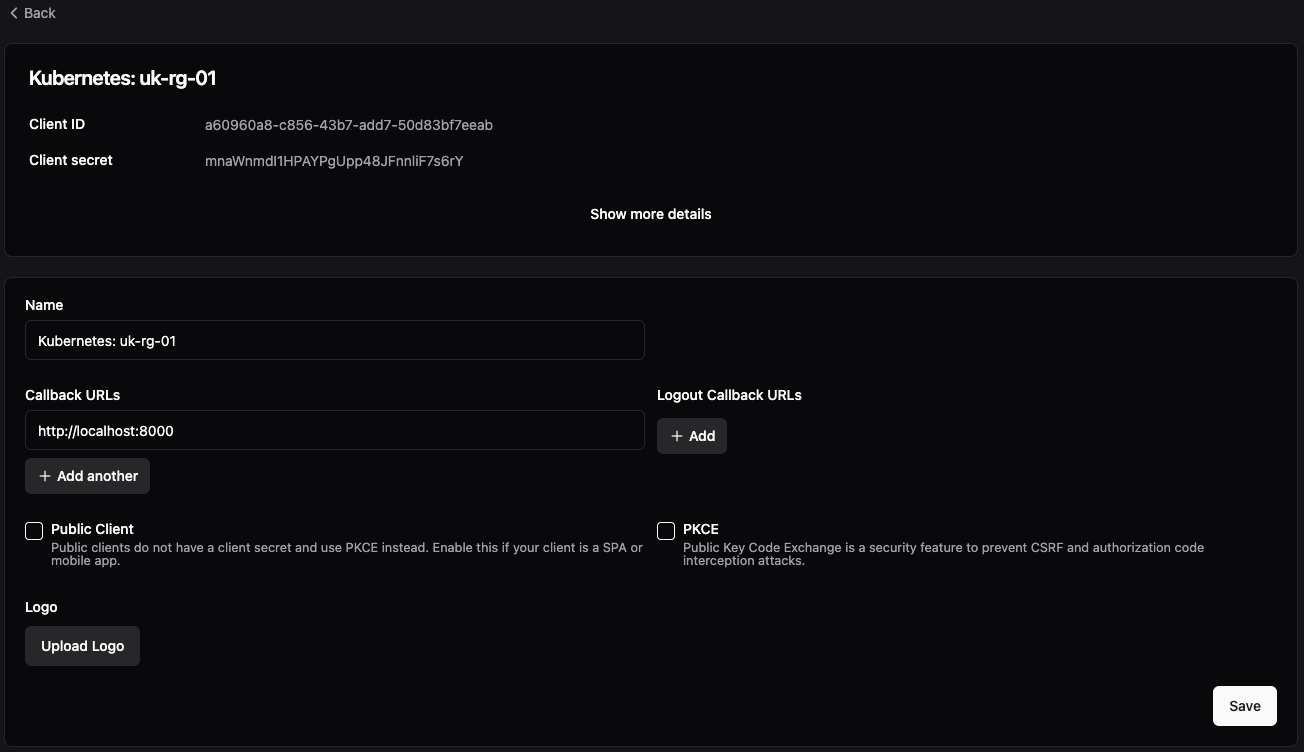
Copy and paste the Client ID and Client secret in to a note as we will need this later on
Create a group called Kubernetes and add your self to this group. Also add this to the application. We will need this
in a later step
Configure Talos
You should have a file called controlplane.yaml from when you set up your talos cluster, we will be making modifications to this
We need to setup the API server to use OIDC to validate users, which is done as apiServer.extraArgs in the controlplane.yaml file
The API server requires some values, as specified in the Documentation ⧉
These are:
| Parameter | Description |
|---|---|
| oidc-issuer-url | URL of the provider that allows the API server to discover public signing keys. Only URLs that use the https:// scheme are accepted. This is typically the provider's discovery URL, changed to have an empty path. |
| oidc-client-id | A client id that all tokens must be issued for |
| oidc-username-claim | JWT claim to use as the user name. |
| oidc-groups-claim | JWT claim to use as the user's group. If the claim is present it must be an array of strings. |
| oidc-groups-prefix | Prefix prepended to username claims to prevent clashes with existing names (such as system: users). For example, the value oidc: will create usernames like oidc:jane.doe |
The below is an oversimplified version of the file, with the changes we need to make. Using the URL of the server (eg: pocket-id.example.com) for the oidc-issuer-url and the Client ID for the oidc-client-id
cluster:
    apiServer:
        image: registry.k8s.io/kube-apiserver:v1.33.1 # The container image used in the API server manifest.
+       extraArgs:
+           oidc-issuer-url: <url of pocket-id>
+           oidc-client-id: <Client ID from Pocket ID>
+           oidc-username-claim: sub
+           oidc-groups-claim: groups
+           oidc-groups-prefix: "oidc:"
Once these changes have been made, you will need to update all your API servers
Create a cluster role binding before you proceed
If you do not create a role binding you run the risk of locking your self out.
ask me how I know this...
# filename=crb.yaml
apiVersion: rbac.authorization.k8s.io/v1
kind: ClusterRoleBinding
metadata:
  name: cluster-admins-from-pass-keys
roleRef:
  apiGroup: rbac.authorization.k8s.io
  kind: ClusterRole
  name: cluster-admin
subjects:
  - apiGroup: rbac.authorization.k8s.io
    kind: Group
    name: oidc:kubernetes
The reason the subjects.0.name is set to oidc:kubernetes is this is the group our user is part of, and we're prefixing
groups from Pocket-id with oidc in case you have other group integrations etc
Apply this kubernetes resource
Now we're able to apply the Talos config updating the API server
Note, your command may be different if you've got your config file in a central location
Configure your kubectl
You will need a command line tool called kubelogin
This can be installed with the below commands
We first need to test that we're getting a JWT token back from our Pocket ID instance.
Replace <pocket ID url>, <client ID>, and <client secret> with the values from the start
kubectl oidc-login setup \
--oidc-issuer-url=<pocket ID url> \
--oidc-client-id=<client ID> \
--oidc-client-secret=<client secret> \
--oidc-extra-scope=groups,email,name,sub,email_verified
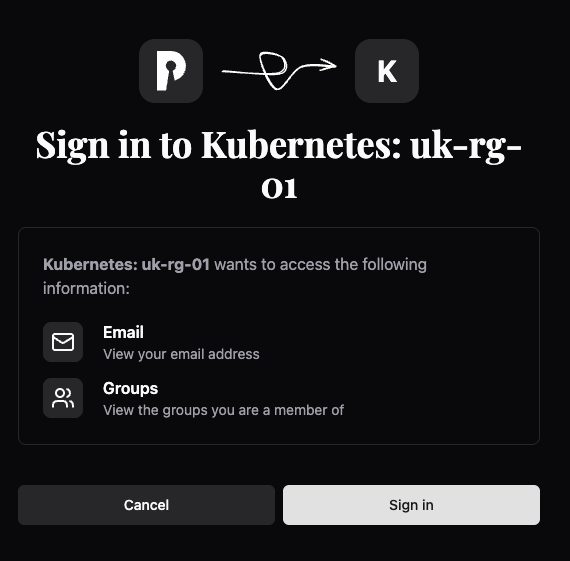
Press enter on your keyboard
You should see a page like the below come up in your browser. Click Sign in
Once you've signed in and done your pass key flow, you should see a page like the below:
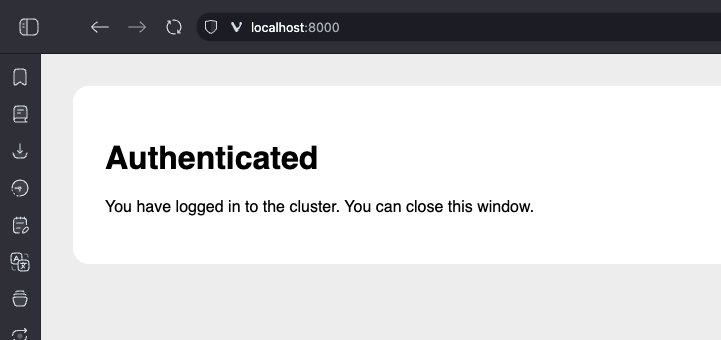
If you do not see this, see the Possible errors section
Checking back in your command line, if you scroll up you will see something like this. We need to check that the groups
are returned and the email is your user's email address.
email_verified
If your email is not verified, you will not be able to use Kubernetes. See Email not verified
{
  "aud": "a60960a8-c856-43b7-add7-50d83bf7eeab",
  "email": "username@domain.com",
  "email_verified": true,
  "exp": 1749867571,
  "groups": [
    "kubernetes"
  ],
  "iat": 1749863971,
  "iss": "<Pocket ID url>",
  "nonce": "sLY0SUaiLxe9JDfUpNEsBDbhKceOB-T1zxxRYJPQbvk",
  "sub": "643c3fba-370a-4738-92a6-9ergec96cd99"
}
Now we can create a new user in our ~/.kube/config file
I will call mine pass-key as it's using passkeys, but you can call it what ever you want.
Open the ~/.kube/config file and at the bottom add in the below
- name: pass-key
  user:
    exec:
      apiVersion: client.authentication.k8s.io/v1beta1
      args:
        - oidc-login
        - get-token
        - --oidc-issuer-url=<pocket ID url>
        - --oidc-client-id=<pocket ID url>
        - --oidc-client-secret=<pocket ID url>
        - --oidc-extra-scope=groups
        - --oidc-extra-scope=email
        - --oidc-extra-scope=name
You will then need to find your context section of the file and update the cluster username to use pass-key
 - context:
     cluster: testing
     namespace: default
-    user: admin@testng
+    user: pass-key
-   name: admin@testing
+   name: testing
You should now be able to do a kubectl get pods and it will make you log in via the web page
Possible errors
Invalid callback URL, it might be necessary for an admin to fix this
Check the call back URL is set to http://localhost:8000
If you have something running on that port, you can set the oidc-login tool to use a different port
- name: pass-key
  user:
    exec:
      apiVersion: client.authentication.k8s.io/v1beta1
      args:
      - oidc-login
      - get-token
      - --oidc-issuer-url=<pocket ID url>
      - --oidc-client-id=<pocket ID url>
      - --oidc-client-secret=<pocket ID url>
      - --oidc-extra-scope=groups
      - --oidc-extra-scope=email
      - --oidc-extra-scope=name
      - --listen-address=127.0.0.1:9090
error: You must be logged in to the server (Unauthorized)
Check that your email is verified. You need to have a verified email address, see email not verified
Try also clearing your token
invalid bearer token, oidc: email not verified
This error is seen by checking the logs on the kube-api-server pod
This is because you're using the email claim for the username, as such kubernetes will reques the email_verified claim
which you can see here ⧉
Either verify your email by setting up SMTP or set all emails as verified under Application Configuration > Emails Verified
Still nothing is working
Try increase the verbostiy level
Edit your ~/.kube/config file
 - name: pass-key
   user:
     exec:
       apiVersion: client.authentication.k8s.io/v1beta1
       args:
       - oidc-login
       - get-token
       - --oidc-issuer-url=<pocket ID url>
       - --oidc-client-id=<pocket ID url>
       - --oidc-client-secret=<pocket ID url>
       - --oidc-extra-scope=groups
       - --oidc-extra-scope=email
       - --oidc-extra-scope=name
+      - -v2
Feedback/ issues
If you are struggling to get this working, please reach out to me and create an issue on the userbradley/documentation.breadnet.co.uk repo!